How I Created a Particle Clock and Won the #FlutterClock Challenge
Google announced The Flutter Clock Challenge on November 18, 2019. It all kicked off right after the mysterious countdown timer on flutter.dev hit 00:00:00, revealing the details of the competition. The brief was refreshingly simple: design a clock using the Flutter UI toolkit. A panel of Google experts would judge entries based on four key criteria: Visual beauty, Novelty of idea, Code quality, and Overall execution.
Having only dabbled in Flutter once or twice before, I saw this as a fantastic chance to roll up my sleeves and dive deeper into the framework.
Initial Ideas
A couple of weeks into the challenge, I had plenty of ideas swirling around but hadn’t written a single line of code. My usual game plan when tackling new problems is to first seek out existing solutions for inspiration. But not this time. Instead, I fired up Figma and started sketching out some ideas from scratch. They were simple, monochrome digital clock designs—honestly, pretty dull.
I quickly grew bored with those designs, so I shut down Figma and downloaded the Flutter Clock GitHub repo to peek at some sample code. The repo had two projects: a basic analog clock and a basic digital clock. Since my Figma sketches were all digital, I naturally opened the digital clock project. But inspiration still eluded me, and with no help from the sample, I put the challenge on pause and turned my attention elsewhere.
A few days later, during one of my morning runs, the challenge crept back into my thoughts. A regular adult checks their watch multiple times a day. For me, the real challenge was making the clock interesting to look at. Could I make “telling the time” a genuinely enjoyable experience—something you’d want to do even if you weren’t curious about the time? That would require more than just a slick design or a fancy animation.
- What if the clock looked different every time you glanced at it?
- Could it spark enough curiosity that you’d eagerly await its next design iteration? Or maybe feel a tiny pang of nostalgia when a favorite look disappeared forever?
- Could I randomize background shapes, colors, and animations in a way that a) looks good, b) feels random enough to satisfy points 1 & 2, and c) doesn’t distract too much from telling the time?
Having never dabbled in generative art before—or much Flutter, for that matter—I decided to build a clock like that.
Particles and Randomness
The first version of the clock was anything but a clock. As I mentioned earlier, I started with the sample digital clock project instead of building from scratch. The very first Widget I created was a CustomPainter that simply drew a circle. Neat, but hardly captivating. So, I added randomness—starting with color, then shape position and size. All the logic lived inside the paint() method of that single CustomPainter. This setup made animation nearly impossible, so I refactored the logic into a simple particle system. I took inspiration from The Flutter Vignettes project to figure out how to do this.
That’s when the idea of an analog particle clock really started to take shape.
Turning Particles Into an Analog Clock
With the idea planted, all that was left was writing the code to bring it to life. The trickiest part for me was the math. Angles, radians, PI—stuff I learned years ago but had since forgotten. Sure, there are plenty of solutions online, but you often have to tweak them to fit your specific case.
Here’s how I calculated the angle in radians for the hour hand:
/// Gets the radians of the hour hand.
double _getHourRadians() =>
    (time.hour * pi / 6) +
    (time.minute * pi / (6 * 60)) +
    (time.second * pi / (360 * 60));
I included time.minute and time.second to make the hour hand move smoothly between hours.
Getting a 2D movement vector from radians is straightforward:
// Particle movement vector.
p.vx = sin(-angle);
p.vy = cos(-angle);
Here, p.vx and p.vy tell each particle how far to move on each animation tick, while staying aligned with the hour hand’s angle.
Besides the clock hands, particles could also spawn as noise, emitted in random directions from the center. At birth, particles are assigned random velocity, color, size, and painting style (fill or stroke), making the clock visually richer.
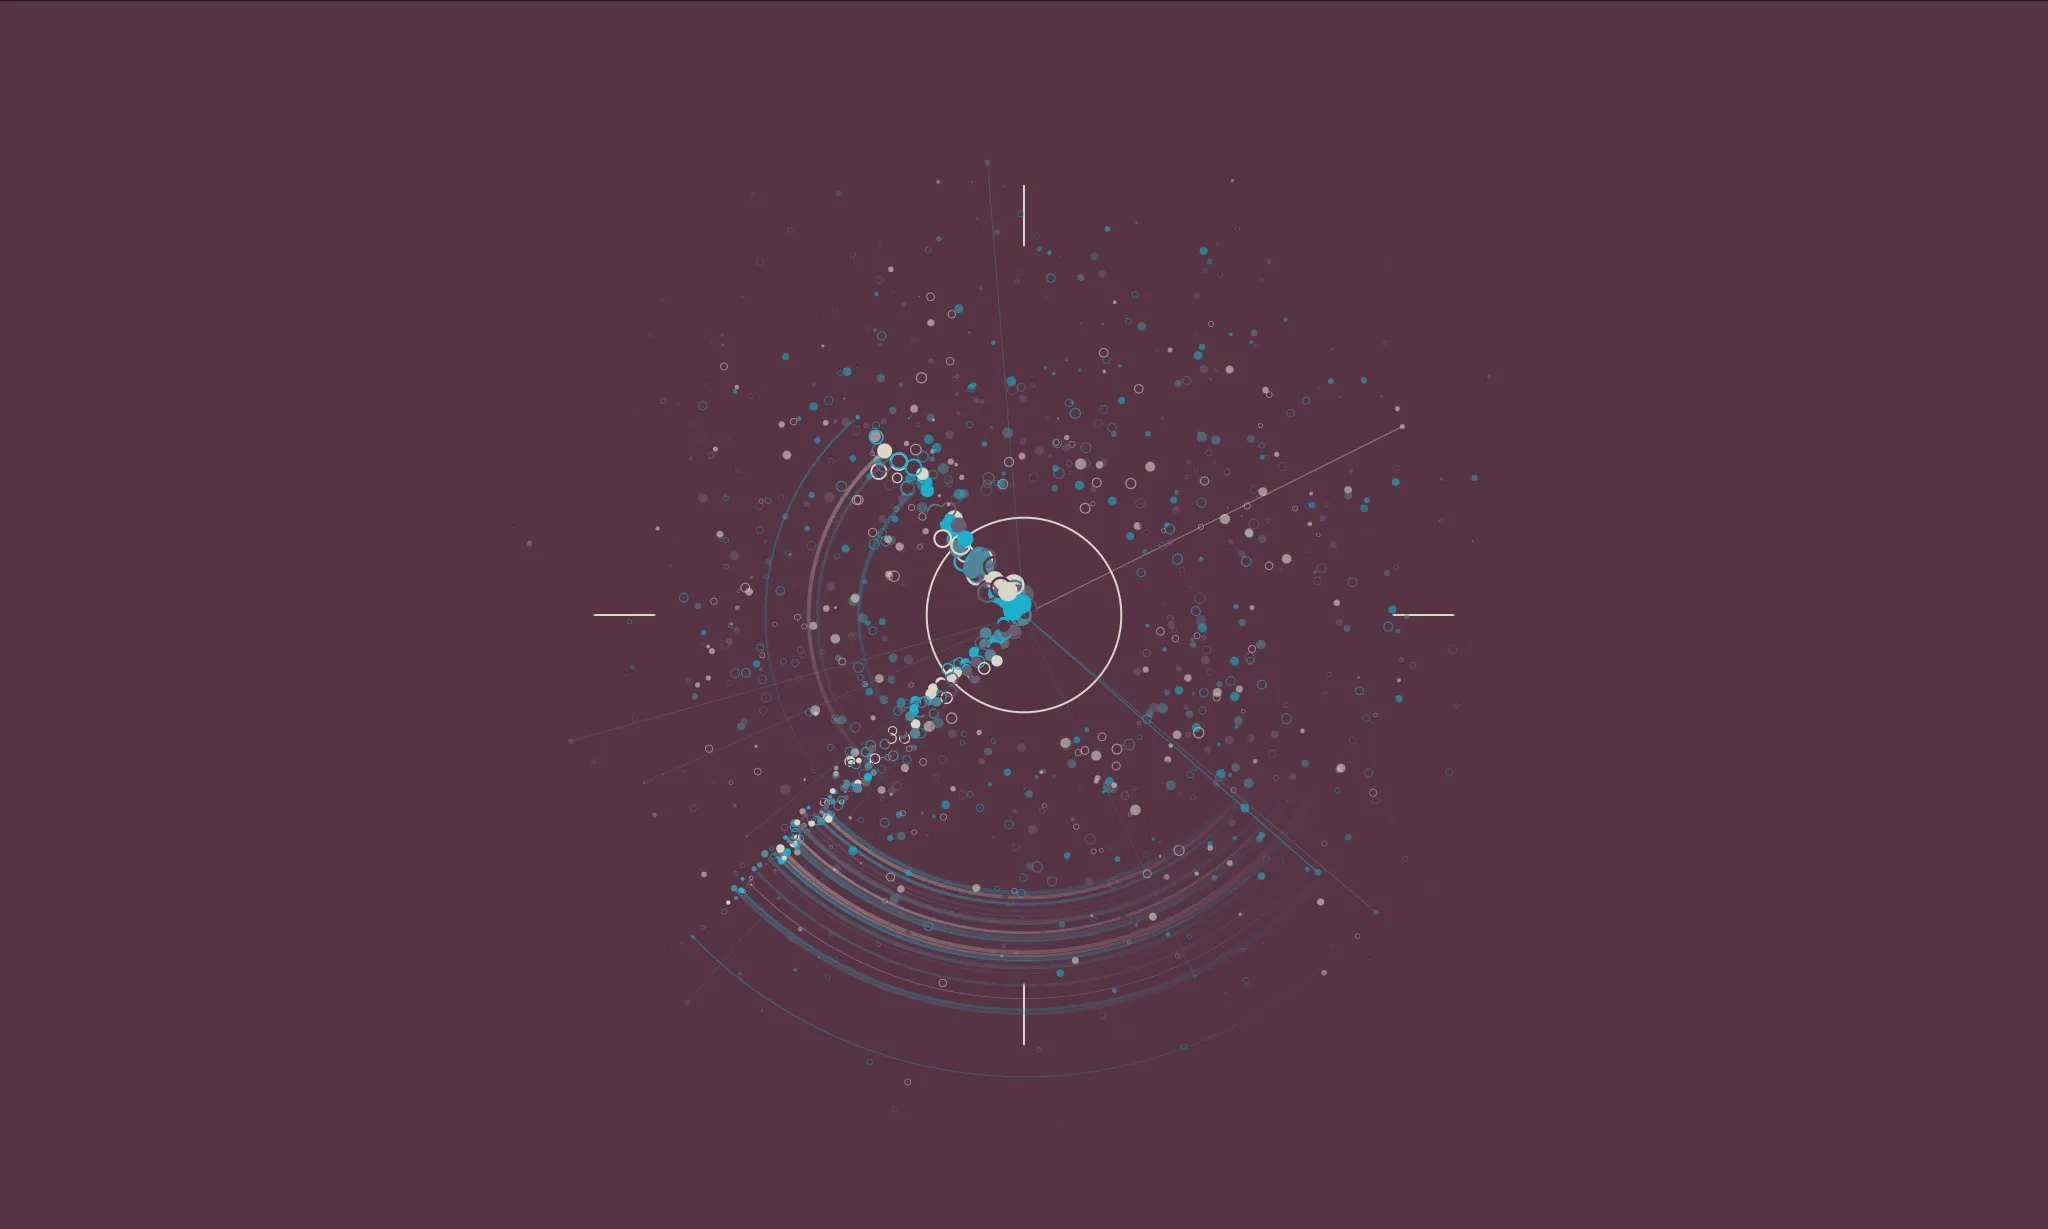
This early version features quarter markers and some particles with speed marks. The very first versions were just particles floating around—no screenshots, unfortunately!
Adding Layers With Flutter Widgets
Up to this point, everything was drawn using a single CustomPainter widget. The clock looked okay but telling time was tricky. Plus, the background was a single, plain color—yawn.
Flutter shines when it comes to building complex layouts. It’s a UI toolkit, after all! To layer widgets on top of each other, you just wrap them in a Stack. The particle clock ended up with a scene widget that builds three main layers:
- Background - a
Stackcontaining aCustomPaintwidget that draws randomized shapes in various colors and painting styles, plus aBackdropFilterapplying a blur effect. - Clock Face - a
Stackwith twoCustomPaintwidgets:- Clock markings—drawing every minute mark, with extra emphasis on every 5th.
- Seconds hand—drawing the two seconds hand arcs.
- Particle FX - a
CustomPaintwidget responsible for drawing all the particles.
@override
Widget build(BuildContext context) {
  return AnimatedContainer(
    duration: Duration(milliseconds: 1500),
    curve: Curves.easeOut,
    color: _bgColor,
    child: ClipRect(
      child: Stack(
        children: <Widget>[
          _buildBgBlurFx(),
          _buildClockFace(),
          CustomPaint(
            painter: ClockFxPainter(fx: _fx),
            child: Container(),
          ),
        ],
      ),
    ),
  );
}
Even though the underlying code is complex, Flutter’s widget composition makes laying things out manageable.

An overlay showing the clock’s drawing layers.
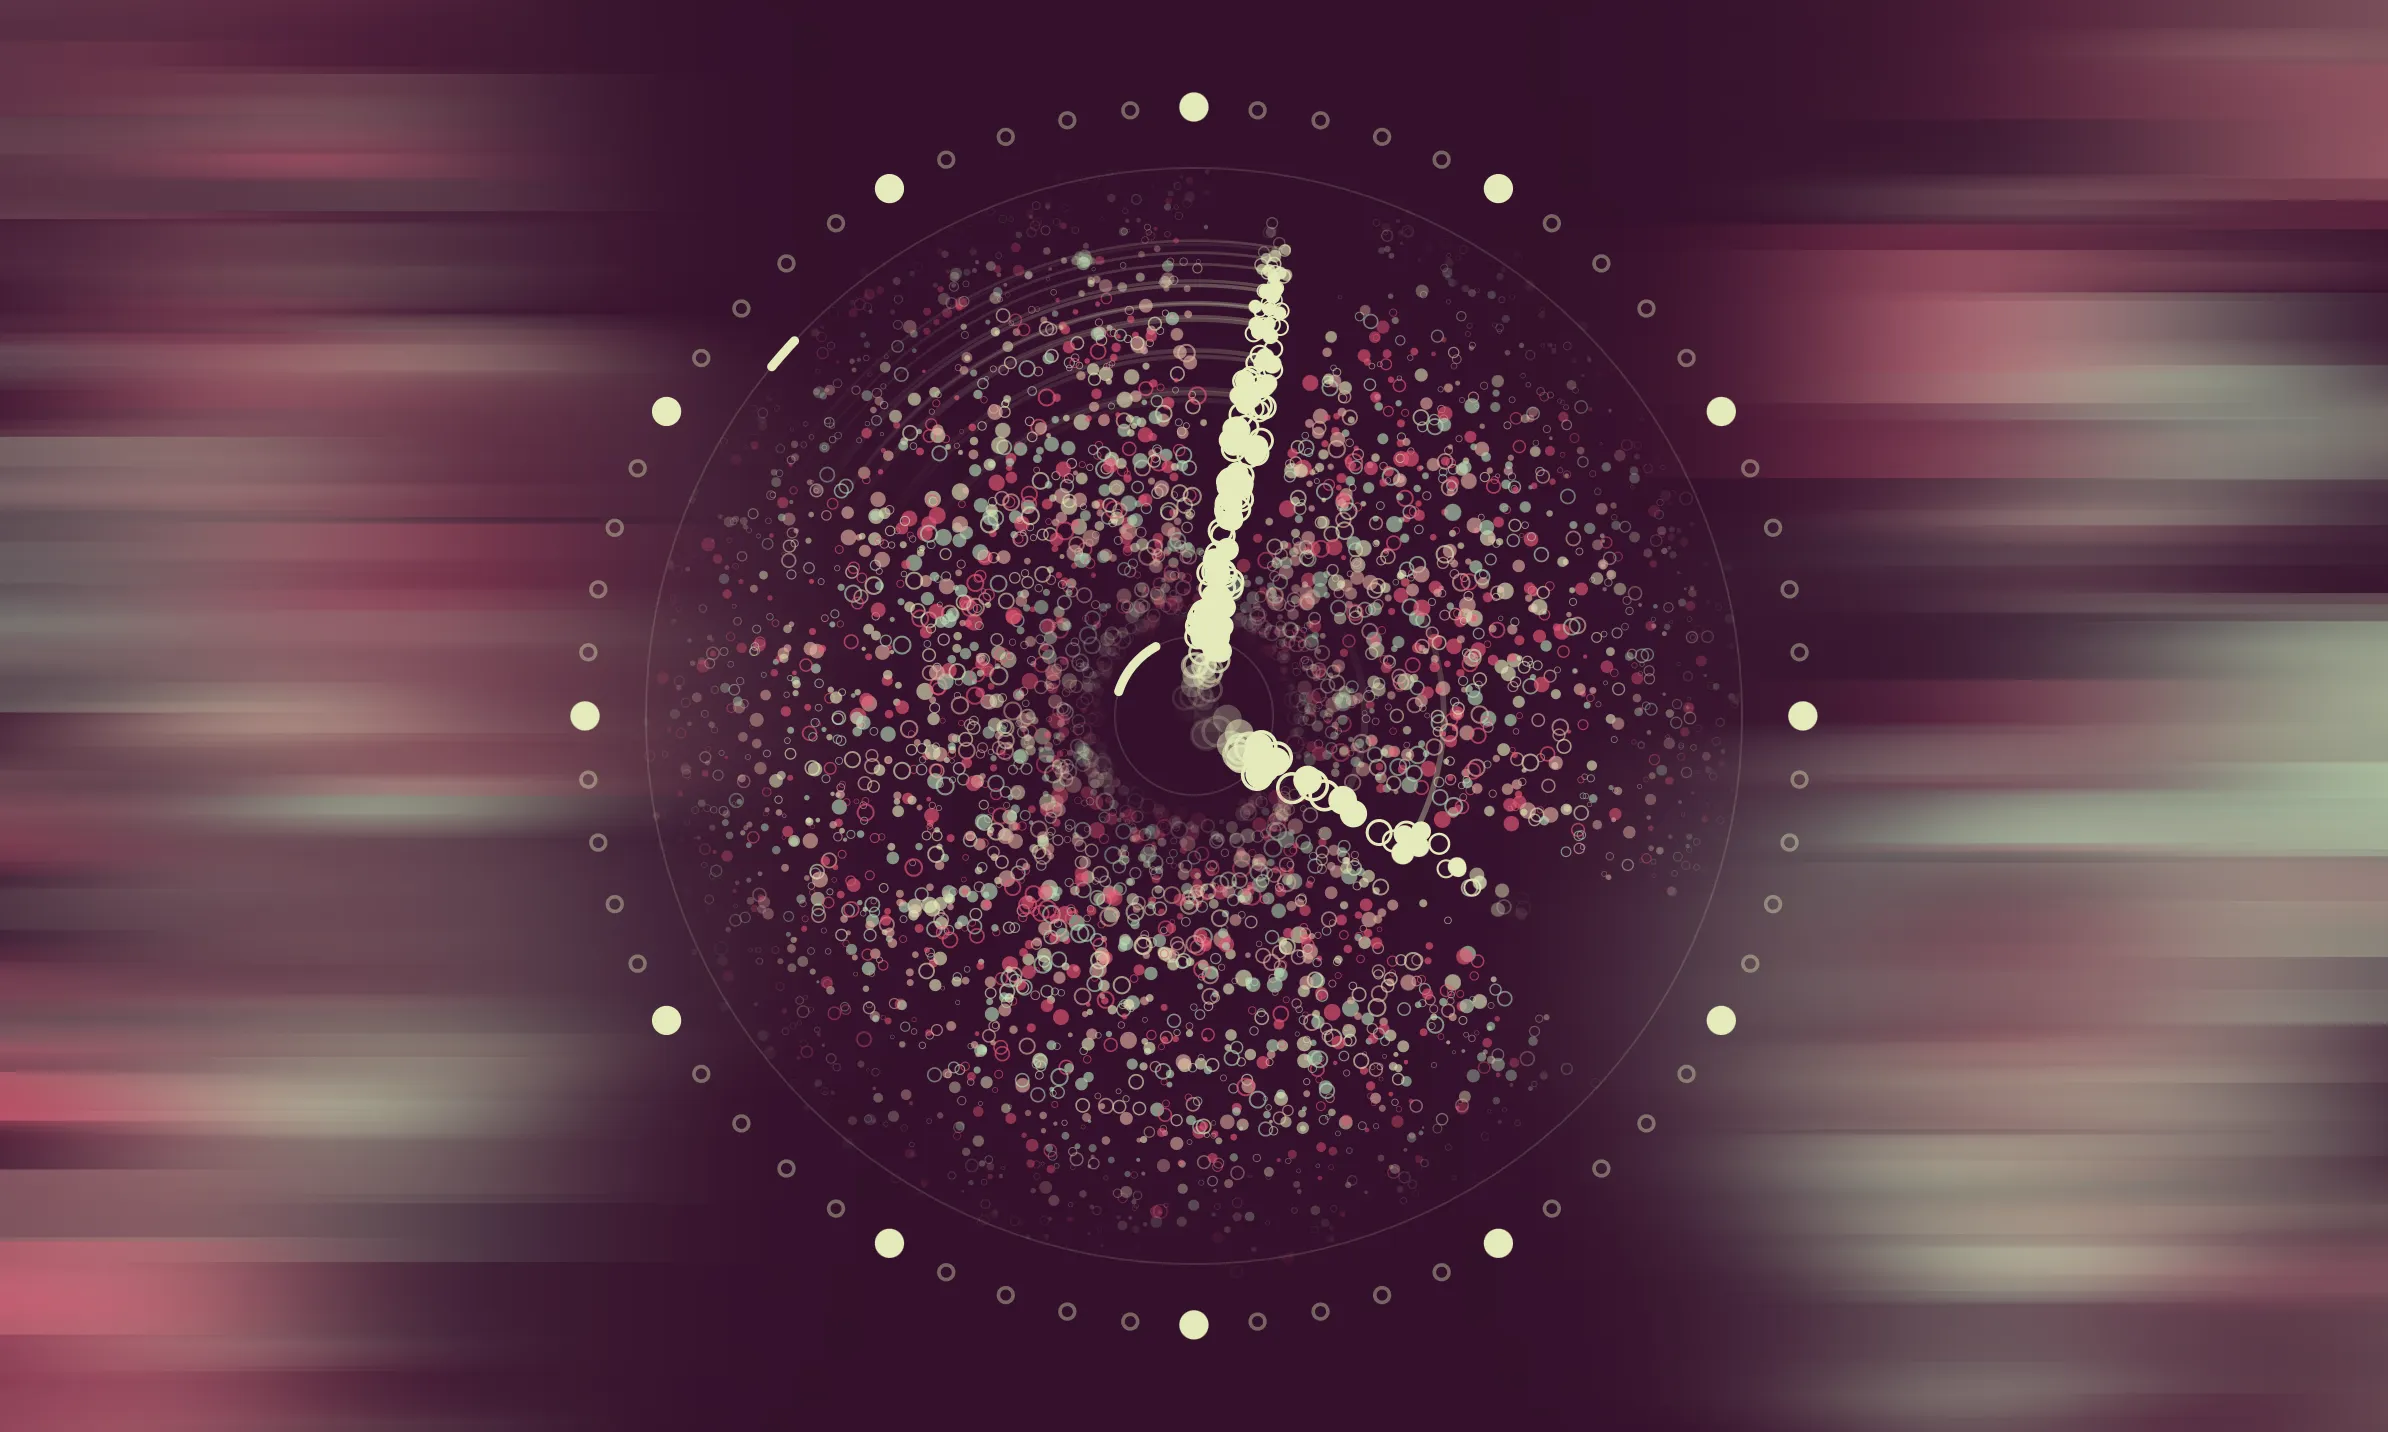
The same picture as above, but without the overlays.
Animating in Sync With Time
Early on, I thought it would be cool if the animation synced perfectly with the clock ticking. The final solution is surprisingly simple, but getting there was a wild ride full of weird hacks and dead ends.
@override
void tick(Duration duration) {
  var secFrac = DateTime.now().millisecond / 1000;

  var vecSpeed = duration.compareTo(easingDelayDuration) > 0
      ? max(.2, Curves.easeInOutSine.transform(1 - secFrac))
      : 1;

  particles.asMap().forEach((i, p) {
    // Movement
    p.x -= p.vx * vecSpeed;
    p.y -= p.vy * vecSpeed;
    // etc...
  }
}
This code runs every animation tick. By using DateTime.now().millisecond as a fraction of a second combined with Flutter’s Curves, we get a smooth value between 0 and 1. The max function keeps the value above 0.2 so particles never completely stop moving.
That vecSpeed value then scales the movement vector, controlling how far each particle moves each tick.
Color Palettes and Legibility
Randomizing colors in GUIs often raises eyebrows—and for good reason. Poor color choices can make interfaces hard to read or inaccessible. But Flutter offers tools that make this easier.
To start, I used the ColourLovers API to fetch some of the most popular user-curated palettes. Many palettes had poor contrast ratios, so I wrote a script to filter them based on the WCAG Contrast guidelines. After filtering, only palettes with at least one color combination having a contrast ratio of 4.5 or higher remained.
Then, in Flutter, I used the computeLuminance method of the Color class to find the best matches.
/// Gets a random palette from a list of palettes and sorts its'
/// colors by luminance.
///
/// Given if [dark] or not, this method makes sure the luminance
/// of the background color is valid.
static Palette getPalette(List<Palette> palettes, bool dark) {
  Palette result;

  while (result == null) {
    Palette palette = Rnd.getItem(palettes);
    List<Color> colors = Rnd.shuffle(palette.components);

    var luminance = colors[0].computeLuminance();

    if (dark ? luminance <= .1 : luminance >= .1) {
      var lumDiff = colors
          .sublist(1)
          .asMap()
          .map(
            (i, color) => MapEntry(
              i,
              [i, (luminance - color.computeLuminance()).abs()],
            ),
          )
          .values
          .toList();

      lumDiff.sort((List<num> a, List<num> b) {
        return a[1].compareTo(b[1]);
      });

      List<Color> sortedColors =
          lumDiff.map((d) => colors[d[0] + 1]).toList();

      result = Palette(
        components: [colors[0]] + sortedColors,
      );
    }
  }
  return result;
}
This method returns a Palette—a simple container holding a list of Colors. The palette is sorted by luminance difference, ensuring the first and last colors have strong enough contrast.
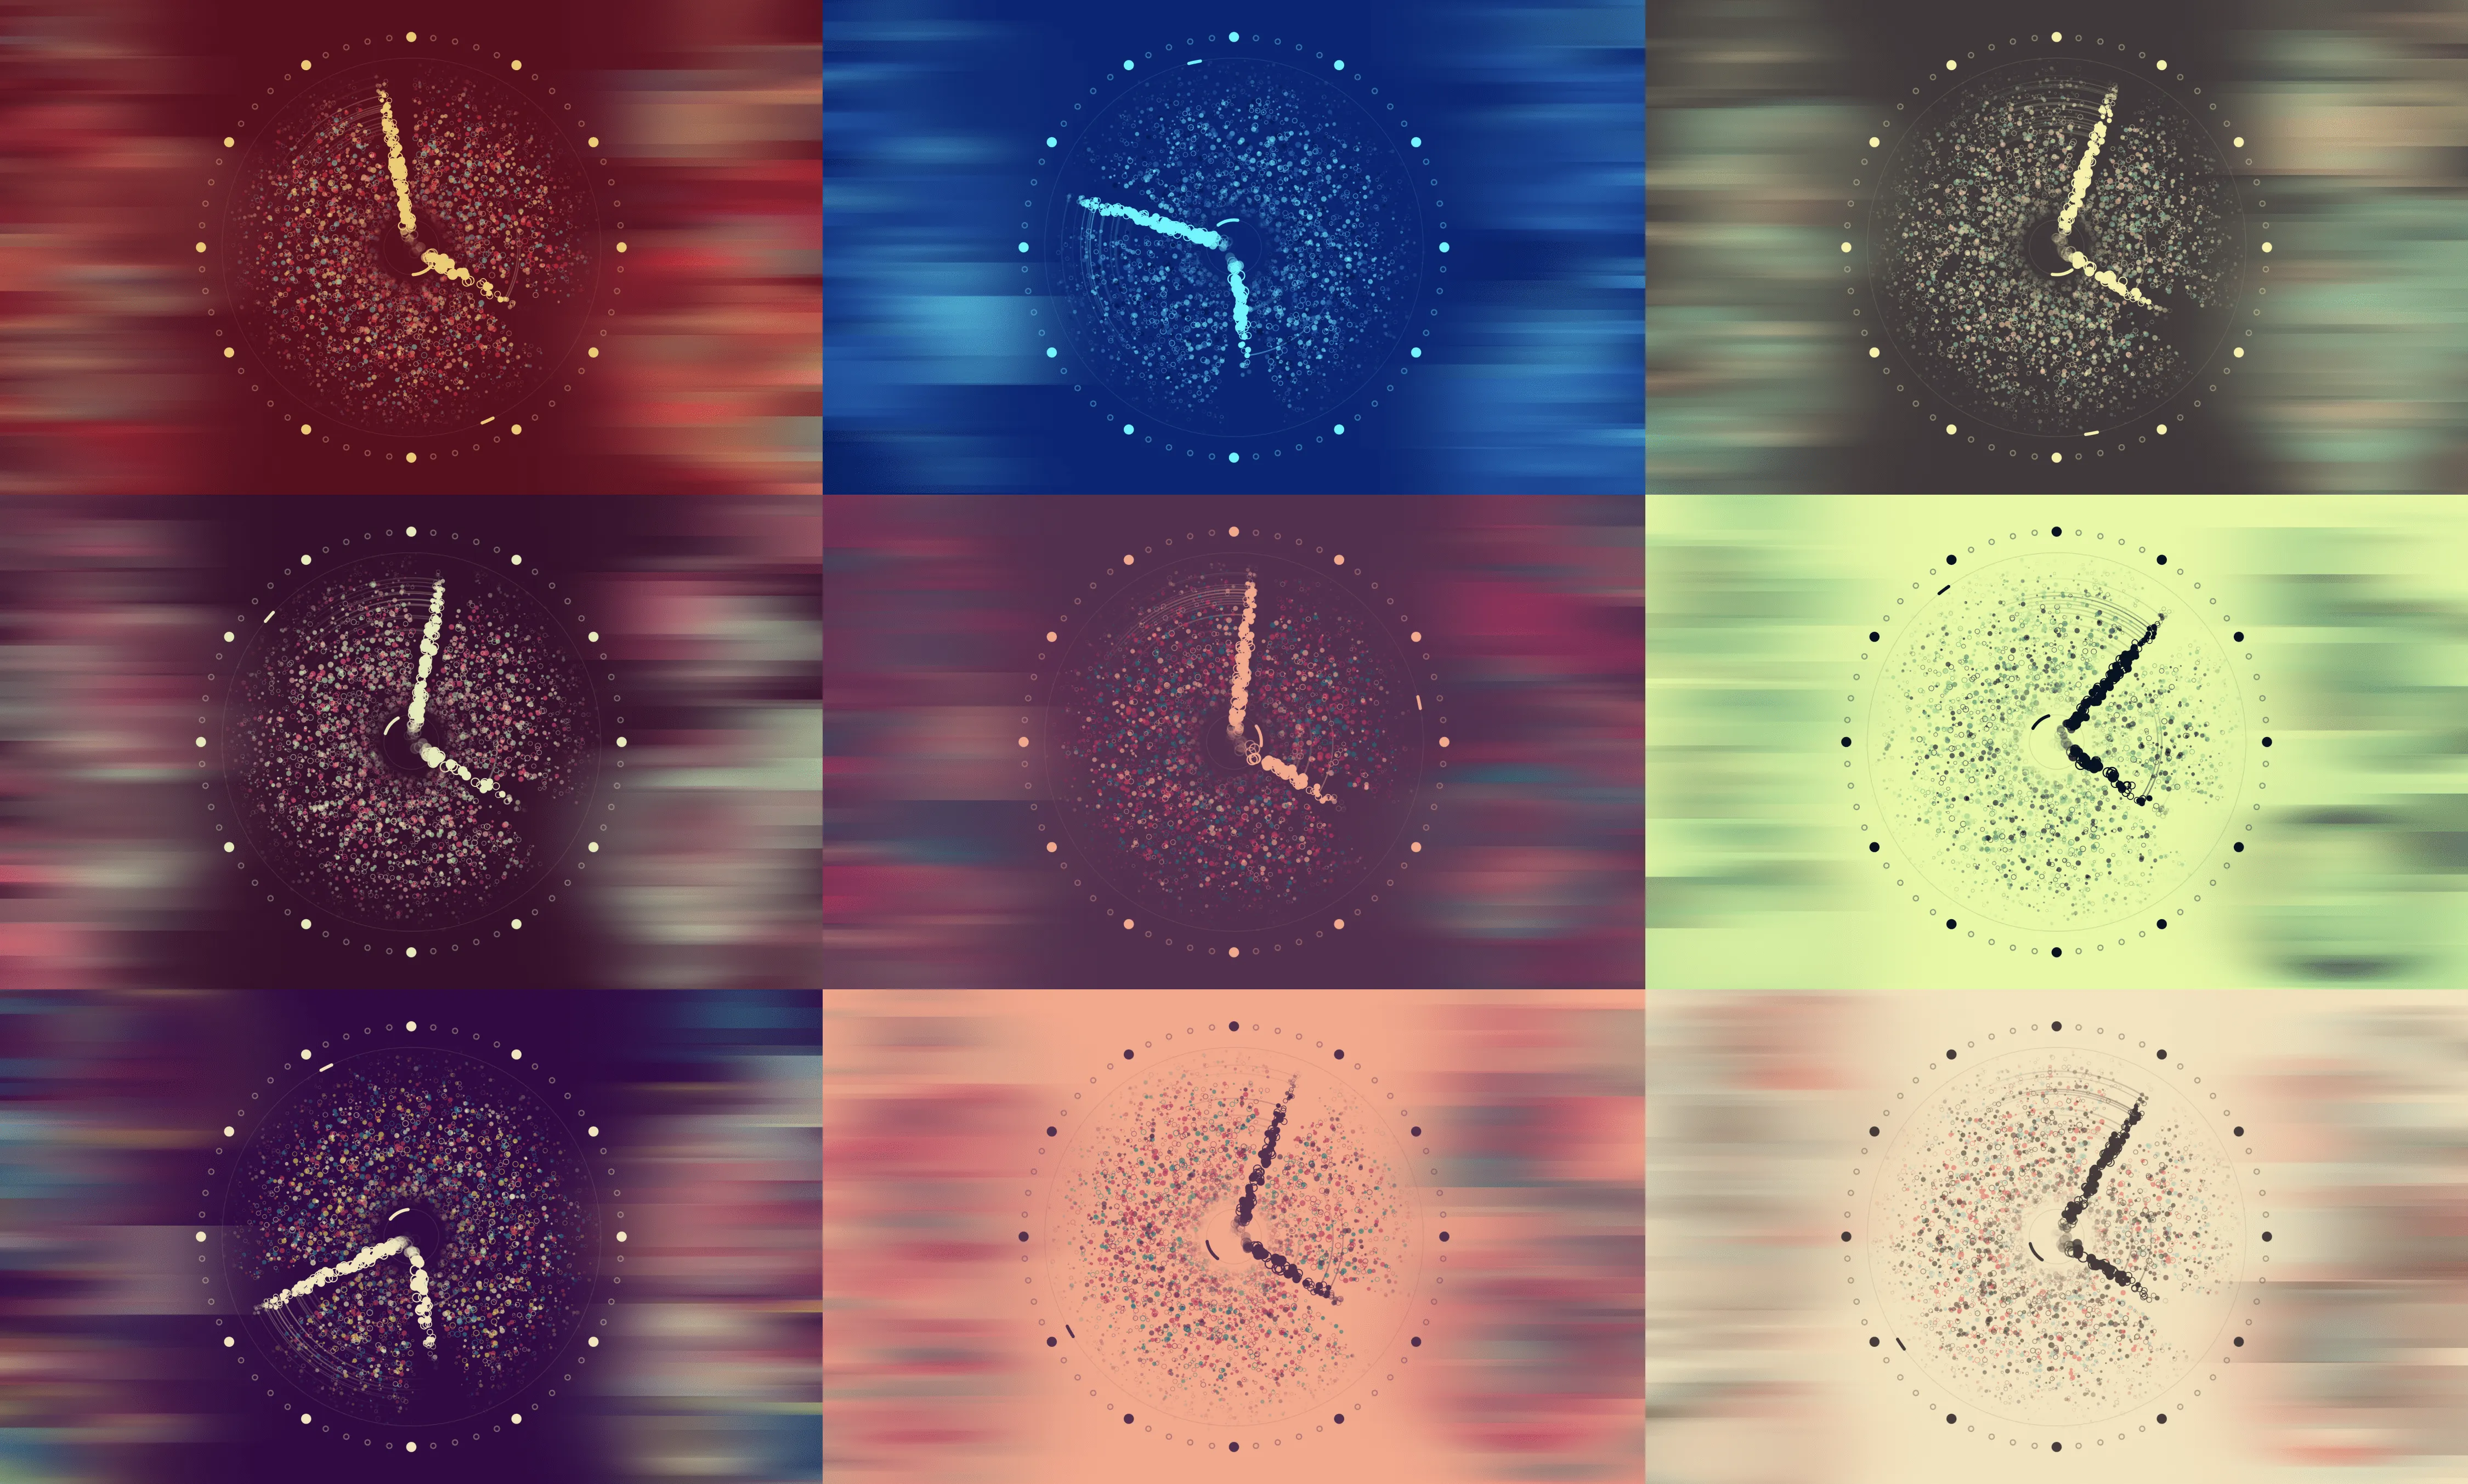
A small sample of the many color variations possible. Notice how the accent color is always the one furthest from the background in terms of luminance.
Final Touches
Most of the magic happened in the final coding hours. I made emitted particles fade in from the center instead of popping up instantly, which gave the clock a smoother look. I applied the same fade effect to the arcs and speed marks, limiting them to only a few particles at a time to keep things visually manageable.
At first, I wasn’t sure how to prevent noise particles from cluttering the areas around the clock hands. After some trial and error—and a bit of brute force coding—I found a solution. (There’s definitely a more elegant math-based approach, but patience wasn’t on my side.)
// Find a random angle while avoiding clutter at the hour & minute hands.
var am = _getMinuteRadians();
var ah = _getHourRadians() % (pi * 2);
var d = pi / 18;

// Probably not the most efficient solution right here.
do {
  angle = Rnd.ratio * pi * 2;
} while (_isBetween(angle, am - d, am + d) || _isBetween(angle, ah - d, ah + d));
It worked! Clearing noise from the hands’ paths made it much easier to tell the time.
Results
Sure, it was frustrating at times (thanks, math! 😅), but I’m thrilled with how it turned out. I especially love the shifting colors and the organic, unpredictable animation.
Flutter is perfect for projects like this. Creativity thrives on experimentation, and Flutter makes that a joy. I started this project aiming to build a digital clock, but thanks to a few lucky mistakes and thousands of small iterations, it transformed into something much better than I imagined.
Martin Aguinis, Global Marketing Lead Flutter for Google, tweeted that they received 850 unique submissions from 86 different countries. Out of all those incredible entries, the Google expert jury chose mine for the Grand Prize—a loaded Apple iMac Pro valued at around $10,000. I’ve never considered myself a top-notch programmer, so when Martin reached out, I was genuinely surprised! I still can’t believe I won.
Huge thanks to Google and the Flutter team for making this challenge happen, and a big shout-out to everyone who cheered me on and showed support on Twitter!
If you enjoyed this journey, subscribe to my newsletter below and follow me on Twitter for more Flutter adventures.
This open-source project is licensed under MIT.